


What’s the Best Solution for Ultrasonic Cleaning?
Browse Volume:159 Classify:Support
It’s easy to assume that the magic of ultrasonic cleaners lies purely in the sound waves—the way they create microscopic cavitation bubbles that scrub dirt from crevices you can’t reach. But here’s the truth: without the right cleaning solution, even the most advanced ultrasonic cleaner can underperform.
Think of it this way—cavitation is like a brush, but your solution is the detergent. You wouldn’t scrub a greasy dish with just water, would you? The same principle applies here. The right solution amplifies the cavitation effect, allowing it to penetrate residues, loosen oils, and lift away contaminants that pure water would leave behind.
Some users run their machines with only tap water and wonder why their results fall short. Others try strong chemicals and risk damaging both the parts and the machine itself. But when the correct solution is chosen—matched to the part, the material, and the contamination type—the results speak for themselves: clearer jewelry, degreased tools, spotless lenses, and a longer-lasting machine.
Ultrasonic cleaning isn’t just a mechanical process—it’s a chemical one too. And getting the chemistry right starts with understanding what kind of cleaning solution you actually need.
How Ultrasonic Cleaners Actually Work with Solutions
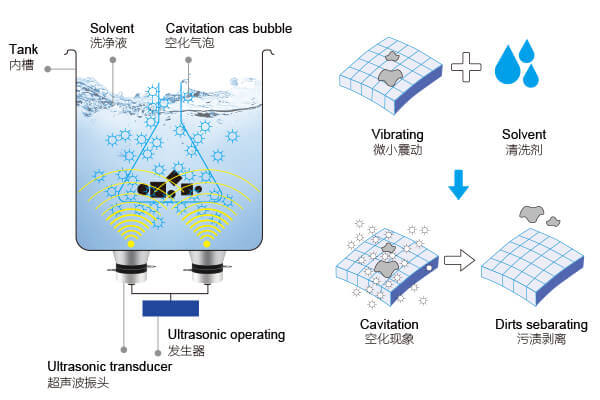
Ultrasonic cleaning works on a scientific principle called acoustic cavitation. When high-frequency sound waves (usually 28kHz to 80kHz) pass through a liquid, they produce millions of microscopic vacuum bubbles. These bubbles collapse violently, releasing energy that dislodges contaminants from even the tiniest surface features—grooves, threads, joints, and pores.
But there’s a catch. Cavitation doesn’t happen efficiently in just any liquid. The solution’s surface tension, viscosity, and gas content all influence how easily those bubbles can form and collapse.
Water has relatively high surface tension, which makes bubble formation harder. That’s where cleaning solutions come in. Most ultrasonic cleaning fluids contain surfactants—compounds that reduce surface tension—along with detergents, chelators, and sometimes enzymes or mild acids, depending on the task.
These additives help break down oils, suspend particles, dissolve corrosion, or emulsify greases. In short, the solution isn’t just passive—it actively participates in the cleaning process.
And that’s why using the correct solution is crucial. Without it, you’re only getting half the benefit of what your ultrasonic cleaner can do.
The Principle Behind Ultrasonic Cleaning
The Real Difference Between Tap Water, Distilled Water, and Deionized Water
Before we dive into commercial solutions, let’s talk about the base: water. The kind of water you use as a starting point matters more than most people think.

Water
Tap water, while convenient, often contains minerals like calcium and magnesium. These can interfere with surfactant activity, reduce cavitation efficiency, and leave residues on cleaned items—especially on glass, lenses, or polished metals. It’s better than nothing, but it’s far from ideal.
Distilled water, on the other hand, is pure H₂O—no minerals, no contaminants, no surprises. It supports cavitation far more effectively and avoids leaving spots on delicate parts. That’s why most professionals use distilled water as their default choice, especially when cleaning optical components, medical instruments, or electronics.
Deionized water (DI water) takes purity even further by removing charged particles like sodium, chloride, and sulfate. In industrial and laboratory settings, DI water is essential for avoiding chemical reactions or contamination. However, DI water can be slightly more aggressive, so when used, it’s often mixed with buffered solutions designed to neutralize reactivity.
Bottom line? Unless you’re doing high-precision lab work, distilled water is your best bet. It’s cheap, effective, and cavitation-friendly—making it the ideal base for any ultrasonic cleaning solution.
Types of Cleaning Solutions and Their Applications
Now we arrive at the heart of the matter: which solution should you use for which task?
Not all ultrasonic cleaning jobs are created equal. The cleaning solution you choose depends on the material, the type of contamination, and the sensitivity of the object. Let’s explore the main categories.
Cleaning Agent
1. Neutral-pH Detergents
These are the most versatile and safest choices for general cleaning. They’re non-corrosive, non-toxic, and compatible with most metals, plastics, and ceramics. Ideal for jewelry, glasses, small machine parts, and even some electronics. They don’t strip coatings or attack adhesives.
2. Alkaline Solutions
Need to tackle oils, greases, carbon buildup, or polishing compounds? Alkaline solutions are your go-to. These typically range from pH 9 to 13 and work best on stainless steel, aluminum (with care), brass, and ceramics. They saponify oils and emulsify greasy residues.
3. Acidic Solutions
Acid-based ultrasonic fluids (pH 1–5) are powerful for removing oxidation, rust, scale, or mineral deposits, but must be handled with caution. They’re often used for steel tools or heat exchangers, but they can etch aluminum, damage soft metals, and corrode sensitive alloys if misused.
4. Enzyme-Based Cleaners
These are specialty solutions used for cleaning biological residues, like proteins, blood, or organic films. Ideal in medical, dental, or laboratory environments.
Each type has its place, and choosing the wrong one can reduce cleaning performance or even cause damage. But when matched correctly, the results are consistently impressive.
DIY Cleaning Solutions: When to Use (and When Not to)
There’s a certain allure to homemade fixes. Mix a little dish soap with water, throw in a splash of vinegar, and suddenly you’ve got a “solution,” right? For some light jobs—like cleaning coins or basic tools—this can work, especially if you’re in a pinch. But the truth is, DIY cleaning fluids often fall short when used in ultrasonic machines.
Let’s break it down. Ultrasonic cleaning relies on more than just foam or fizz. It needs precise chemical balance to reduce surface tension, suspend particles, and avoid bubble interference. While something like a mild dish detergent might clean fingerprints off glass, it often doesn’t emulsify oils or lift deep-seated grime the way a professionally formulated solution does.
Then there’s the risk factor. Vinegar, baking soda, ammonia, or hydrogen peroxide are popular in home recipes—but they’re not ideal in an ultrasonic cleaner. For example:
- Vinegar is acidic and can etch aluminum, dull gemstones, or corrode stainless steel
- Hydrogen peroxide decomposes and can generate gas bubbles, disrupting cavitation
- Baking soda doesn’t dissolve fully and leaves abrasive residues
Most critically, these DIY solutions can damage your ultrasonic cleaner’s tank over time. Many commercial units, such as those from Granbo, are made from industrial-grade stainless steel—but even these have limits when exposed to reactive homemade chemicals, especially at elevated temperatures.
So, when is DIY okay? If you’re cleaning non-delicate metal tools, and you’re monitoring closely, a simple diluted detergent might be fine. But if you’re cleaning jewelry, electronics, or anything of value, stick with professionally formulated solutions—your results (and machine) will thank you.
Materials That Require Special Cleaning Formulas
One of the biggest advantages of ultrasonic cleaning is its versatility across materials—but that’s also where most people make mistakes. What cleans an engine part beautifully might ruin a gemstone. So let’s explore some key materials and the solutions they require.
Jewelry: From Diamonds to Silver
Fine jewelry isn’t just about sparkle—it’s about structure. Diamonds, platinum, and solid gold can typically handle neutral or slightly alkaline ultrasonic cleaners. However, pearls, emeralds, opals, turquoise, and plated items? These are porous or delicate and can either absorb fluid or break apart under pressure. For these, use ultrasonic-safe jewelry solutions, like those available from Granbo, and stick to short cleaning cycles.
Optical Glass and Camera Lenses
When it comes to optical equipment, residue is your enemy. Any leftover surfactant can ruin clarity or interfere with coatings. That’s why distilled water with ultra-low residue neutral detergents is used.
Printed Circuit Boards (PCBs) and Electronics
Cleaning PCBs requires extreme care. You want to remove flux, solder paste, or dust—but without lifting traces or damaging seals. The correct solution here is an alcohol-free, non-conductive, micro-emulsion fluid. Never use acetone or isopropanol in your ultrasonic tank.
Carburetors, Injectors, and Engine Parts
These are some of the most satisfying items to clean ultrasonically. Use an alkaline degreasing solution, preferably one formulated for automotive use.
Medical Instruments and Labware
These require enzyme-based or neutral-pH disinfectant solutions. Because you’re dealing with biological contaminants, the solution must break down proteins but also rinse cleanly.
Choosing the right solution isn’t just about effectiveness—it’s about preserving the integrity of the object you’re cleaning.
What Not to Use in an Ultrasonic Cleaner
If you’re tempted to “go strong” with bleach, acetone, or alcohol—stop. These harsh solvents may cut through grease, but they do not belong in ultrasonic machines. Here’s why:
- Bleach corrodes stainless steel tanks and can release toxic vapors when heated
- Acetone is highly flammable, and cavitation can trigger vaporization
- Alcohol evaporates easily, disrupting bubble formation and posing fire hazards
- Vinegar and citrus cleaners—despite being “natural”—are still acids and can damage tanks and delicate parts
Moreover, these chemicals can degrade the rubber seals, heating elements, and bonding adhesives used in the ultrasonic cleaner itself.
Granbo clearly advises against using any flammable or highly corrosive fluids in their ultrasonic cleaners. Doing so could void the warranty—and more importantly, it may pose serious risks to both your health and the machine.
Stick to formulations that are explicitly labeled ultrasonic-safe. When in doubt, go neutral.
Using Ultrasonic Cleaning Solutions the Right Way
The power of a great cleaning solution isn’t just in its ingredients—it’s in how you use it.
Even the best ultrasonic fluid can fall short if misapplied. Fortunately, getting it right is simple when you follow a few key principles. And when you’re using a high-quality ultrasonic cleaner from Granbo, the process is even more streamlined thanks to intuitive controls and a well-engineered tank design.
Let’s walk through what a properly executed cleaning cycle looks like.
Step 1: Measure and Mix Accurately
Most ultrasonic cleaning concentrates are designed to be diluted with distilled water. A 1–5% concentration is typical—meaning for a 2-liter tank, you’d use 20–100ml of solution. Don’t guess. Over-concentration can reduce cavitation and waste product; under-dosing can lead to incomplete cleaning.
Step 2: Degas the Solution First
Freshly mixed solutions contain dissolved gases that interfere with cavitation. Using the “Degas” mode found in many Granbo professional series ultrasonic cleaners, run the unit for 5–10 minutes without any items inside. This clears the bubbles, allowing optimal cleaning performance when you insert your parts.
Step 3: Pre-Rinse if Necessary
For items with visible dirt, grease, or biological residues, a quick pre-rinse or brush-off removes bulk contaminants. This prevents your solution from being overwhelmed prematurely and improves overall results.
Step 4: Set the Temperature Carefully
Not all solutions require heat, but many perform better with it. For neutral detergents, 30°C to 40°C is usually ideal. For alkaline degreasers, 50°C to 60°C often yields the best effect. Granbo’s digital models allow precision down to 1°C, ensuring delicate parts aren’t overheated.
Step 5: Mind the Cleaning Time
More isn’t always better. Most cleanings only need 3 to 10 minutes. Beyond that, you risk unnecessary wear, especially on plated jewelry or soft plastics. Use the timer—don’t rely on guesswork.
Step 6: Rinse and Dry Properly
After cleaning, rinse items thoroughly in distilled water to remove any detergent residue. Then dry completely—preferably with a lint-free cloth or low-pressure air. Leaving detergent behind can cause streaks or attract dirt faster.
Follow these steps, and your cleaning solution will work at its full potential—especially when paired with the consistent performance of a Granbo ultrasonic bath.
Common Mistakes to Avoid When Using Cleaning Solutions
Even with the best ultrasonic machine and high-grade solution, some users still encounter disappointing results. In almost every case, it boils down to misuse of the solution or neglecting the process.
Let’s talk about a few of the most common mistakes—and how you can avoid them.
Overconcentration
It’s tempting to think that more detergent means more cleaning power. But in ultrasonic cleaning, too much solution can reduce cavitation, making the process less effective. Always follow manufacturer recommendations—Granbo provides clear dilution charts based on tank size and application.
Using Tap Water
Tap water contains minerals that not only interfere with cavitation but also leave residue on delicate parts like glass, optics, and polished metals. Worse, over time it can corrode your ultrasonic tank. Always use distilled or deionized water when mixing solutions.
Reusing Dirty Solution Too Many Times
Ultrasonic cleaning solutions degrade with use—especially when pulling out oils, soot, or flux. A visibly discolored solution is not just dirty—it’s chemically imbalanced. Regular replacement is key. Granbo suggests changing solution after every 5–10 cycles for best results.
Ignoring Compatibility
Not all cleaning fluids are universal. Using an aggressive degreaser on plated jewelry, or an acidic descaler on electronics, can cause damage. Make sure your solution matches your item type. If unsure, refer to Granbo’s application-specific recommendations or consult with their support team.
Skipping the Rinse
Even the best ultrasonic fluid can leave residue if you skip the final rinse step. Always rinse cleaned items in fresh distilled water to avoid spotting, streaks, or chemical buildup—especially on items that touch skin or optics.
Avoiding these small errors makes a big difference, turning “meh” results into professional-grade cleaning—just as thousands of Granbo users around the world have discovered.


