


Maximizing Your Ultrasonic Cleaner’s Performance
Browse Volume:49 Classify:Support
Ultrasonic cleaners promise sparkling results with minimal effort, but many users find themselves disappointed when their jewelry still looks dull or their tools remain grimy. The problem usually isn’t the machine itself. Instead, it’s how you’re using it. Small adjustments to your cleaning process can transform mediocre results into professional-grade cleanliness.
Understanding How Ultrasonic Cleaning Actually Works
Most people use ultrasonic cleaners without really grasping what’s happening inside that tank. This knowledge gap leads to poor technique and disappointing outcomes.
The Science Behind Cavitation
Ultrasonic cleaners generate high-frequency sound waves that create microscopic bubbles in the cleaning solution. These bubbles form and collapse thousands of times per second in a process called cavitation. When the bubbles implode, they release intense energy that dislodges dirt, oils, and contaminants from surfaces.
The collapse of each bubble creates a localized pressure spike and temperature surge that can reach several thousand degrees Celsius for a fraction of a second. This explains why ultrasonic cleaning reaches into tiny crevices that brushes and cloths cannot touch. The cavitation action literally scrubs at a microscopic level.
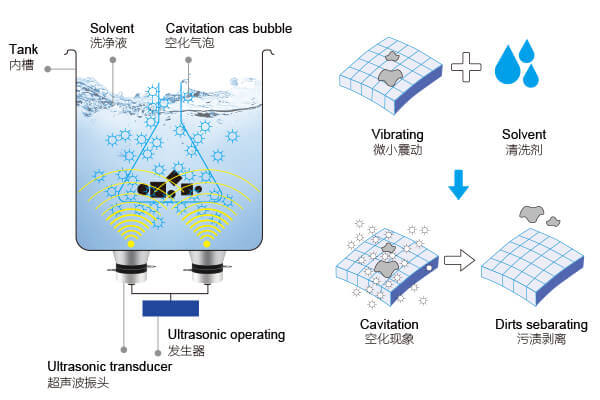
The Principle Behind Ultrasonic Cleaning
However, cavitation only occurs under specific conditions. If your solution is too thick, too cold, or if items are positioned poorly, you won’t get proper bubble formation. The machine will run, but the cleaning action will be severely compromised.
Why Temperature Matters More Than You Think
Temperature directly affects cavitation intensity. Warmer liquids allow bubbles to form and collapse more violently, increasing cleaning power. Most ultrasonic cleaners work best between 60°C and 70°C (140°F to 158°F) for general purposes.
Cold water creates weaker cavitation because the liquid’s surface tension is higher. I’ve tested identical items at different temperatures, and the difference is dramatic. A gold ring cleaned at room temperature for ten minutes showed maybe 60% improvement, while the same ring at 65°C for six minutes came out completely spotless.
That said, heat isn’t always your friend. Some materials like certain plastics, delicate gemstones, or items with adhesives can be damaged by high temperatures. This is where understanding your specific cleaning needs becomes critical.
Choosing the Right Cleaning Solution
Water alone will produce some cleaning through cavitation, but adding the right solution multiplies effectiveness exponentially.

water
Water Alone Isn’t Enough
Pure water has high surface tension, which actually inhibits cavitation. Adding a proper cleaning solution reduces surface tension and enhances bubble formation. Additionally, solutions contain surfactants that help lift oils and grease, chemicals that break down specific contaminants, and agents that prevent redeposition of dirt back onto cleaned surfaces.
Through trial and error, I’ve found that commercial ultrasonic cleaning solutions outperform household alternatives by a significant margin. While some people use dish soap or ammonia mixtures, these often create excessive foam that dampens ultrasonic waves. They can also leave residues that require additional rinsing.
Purpose-formulated ultrasonic solutions are pH-balanced, low-foaming, and designed specifically to work with cavitation. The investment of $15 to $30 for a concentrate that makes several liters of solution pays for itself in improved results and time saved.
Matching Solutions to Materials
Different contaminants and materials require different chemical approaches. Using a jewelry cleaner on automotive parts or an industrial degreaser on delicate eyeglasses will produce poor results at best and damage at worst.
For precious metals and most jewelry, a neutral pH solution works well. These cleaners handle oils, skin residues, and light tarnish without harming metal finishes. For heavily oxidized items, you might need a slightly alkaline solution with chelating agents.
Eyeglasses and optical components need very gentle, pH-neutral cleaners that won’t damage coatings. Industrial parts often require alkaline degreasers that can handle heavy oils and carbon buildup. Medical and dental instruments need solutions that not only clean but also have antimicrobial properties.
Optimal Temperature Settings for Different Items
Getting the temperature right is perhaps the single most impactful adjustment you can make.
Cold vs. Heated Cleaning
Room temperature cleaning (around 20°C to 25°C) has its place for extremely delicate items or when you’re cleaning something you’re unsure about. The cavitation will be gentler, which means slower cleaning but less risk of damage.
Heated cleaning between 50°C and 70°C delivers the best results for most applications. At these temperatures, oils and greases soften, solutions work more actively, and cavitation intensity peaks. Most contaminants dissolve or dislodge much faster.
Some advanced machines offer temperature control, while others heat the solution through the ultrasonic action itself over time. If your cleaner doesn’t have a heater, you can pre-warm your solution using hot tap water or an external heat source, though you’ll need to monitor temperature manually.

Heating Function
Temperature Ranges by Material Type
Gold, silver, platinum, and stainless steel handle high temperatures well. I regularly clean these at 65°C to 70°C with excellent results. Brass and copper can also take heat but might show color changes if solutions are too aggressive.
Soft stones like pearls, opals, turquoise, and emeralds should be cleaned at room temperature or slightly warm (30°C to 35°C maximum). These porous materials can crack from thermal shock or absorb cleaning solutions if heated too much.
Plastics vary wildly. Some modern engineering plastics tolerate 60°C easily, while others warp at 40°C. When in doubt, start cool and gradually increase temperature while monitoring the item.
Electronics and circuit boards should generally be cleaned at moderate temperatures (40°C to 50°C) to avoid damaging sensitive components or melting solder joints with lower melting points.
Proper Item Positioning Techniques
Even with perfect solution and temperature, poor positioning will sabotage your results.
Avoiding Contact with Tank Walls
Items that come into direct contact with the tank walls or bottom may not be cleaned effectively in those areas, as ultrasonic waves cannot fully reach obstructed surfaces. For this reason, our ultrasonic cleaners are equipped with baskets or racks designed to keep items properly positioned during operation.
The basket suspends items within the solution, allowing cavitation to act evenly across all exposed surfaces for consistent cleaning results. Placing items directly on the tank bottom can lead to uneven cleaning, with certain areas remaining untreated.
For larger items that do not fit داخل the basket, we recommend suspending them using plastic or rubber-coated supports. Bare metal wires or clips should be avoided, as they may vibrate during operation and risk scratching or damaging the items being cleaned.
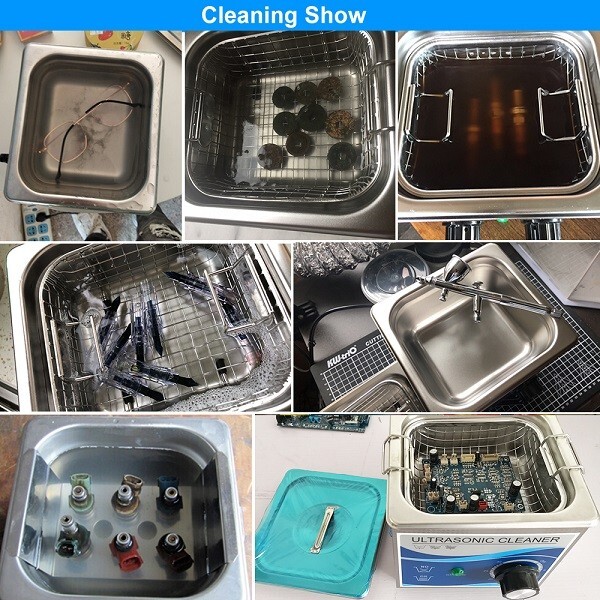
Cleaning Show
Spacing Items for Maximum Exposure
Overloading the cleaning tank is a common cause of reduced performance. When items come into contact with each other, the covered areas are shielded from ultrasonic action and may not be cleaned effectively. In addition, excessive load levels can absorb and disperse ultrasonic energy, lowering overall cleaning efficiency.
For optimal results, we recommend loading no more than approximately half of the basket’s capacity. Items should be arranged with sufficient spacing to allow proper solution circulation and uniform cavitation. For heavily soiled or highly intricate components, individual cleaning cycles are often more effective than batch processing.
Proper positioning also plays an important role. Chains should be spread out rather than tangled. Hollow items, such as rings, should be oriented to allow the cleaning solution to enter internal cavities. Small components, including watch parts, should be placed in a single layer rather than stacked to ensure consistent exposure to ultrasonic energy.
Timing Your Cleaning Cycles Correctly
More time doesn’t always mean better cleaning. In fact, excessive cycles can sometimes damage items or redeposit loosened contamination.
The Myth of Longer Being Better
Most cleaning happens in the first three to five minutes of an ultrasonic cycle. After that, you hit diminishing returns. The initial burst of cavitation removes surface contaminants quickly. What remains usually requires either a different approach or additional solution chemistry rather than more time.
I’ve run controlled tests cleaning identical dirty coins. Three minutes produced 85% improvement, six minutes reached 92%, but fifteen minutes only got to 94%. That extra nine minutes added minimal benefit while consuming energy and potentially wearing down delicate details on the coins.
For typical jewelry cleaning, three to five minutes is usually sufficient. For heavily soiled industrial parts, I might run two six-minute cycles with fresh solution rather than one fifteen-minute cycle.
Multiple Short Cycles vs. One Long Cycle
Running several short cycles with inspection and repositioning between them often beats a single long cycle. After the first cycle, you can see what’s been removed and what remains. You can adjust item position, change solution concentration, or increase temperature for the second cycle.
This approach also prevents redeposition. When contamination suspends in the solution, some can settle back onto items during a long cycle. Fresh solution for each cycle keeps contamination levels low.
For extremely stubborn deposits, I sometimes alternate between ultrasonic cycles and manual brushing. The ultrasonic action loosens the contamination, then a soft brush removes it completely. This prevents debris from floating around and potentially scratching surfaces.
Maintaining Your Ultrasonic Cleaner
A poorly maintained machine can’t deliver good results regardless of technique.
Regular Tank Cleaning
The tank itself accumulates residue over time. After every five to ten uses, I drain the cleaner completely and wipe down the tank with a soft cloth. For stubborn buildup, I run a cleaning cycle with just water and a bit of white vinegar.
The transducer surface (the bottom or sides of the tank where ultrasonic waves generate) needs to stay clean for optimal energy transfer. Any coating of oils or mineral deposits reduces effectiveness. If you notice declining performance despite proper technique, the tank probably needs deep cleaning.
Some users never clean their tanks, just topping off evaporated solution. This is a mistake. Contamination builds up, solution chemistry changes as water evaporates and chemicals deplete, and eventually cleaning power drops noticeably.
Degassing New Solutions
When you first mix a fresh cleaning solution, dissolved gases in the water inhibit cavitation. Running the empty cleaner (with solution but no items) for five to ten minutes releases these gases. You’ll see the solution become cloudy with tiny bubbles initially, then clear as the gases escape.
This degassing step significantly improves cleaning effectiveness. I always degas fresh solutions before adding items. The difference is subtle but measurable. Items cleaned in degassed solution consistently come out slightly cleaner than those cleaned in fresh, un-degassed solution.
Some industrial ultrasonic cleaners have a dedicated degas function. If yours doesn’t, just run it empty for five minutes before your first cleaning cycle.

Click to View : Granbo GA008G Mini Ultrasonic Cleaner (0.8L, 60W) with Digital Control Panel, Timer & Degassing Function for Jewelry
Common Mistakes That Reduce Effectiveness
Even experienced users sometimes fall into these traps.
Overloading the Tank
I’ve mentioned this before, but it bears repeating because it’s such a common problem. People want to clean everything at once to save time, but overloading actually costs time because nothing gets properly clean.
When I’m cleaning a large batch of items, I separate them into groups. Similar items with similar cleaning needs go together. I run multiple cycles rather than cramming everything in at once. Total time is actually less because I don’t have to re-clean items that came out still dirty.
Overloading also stresses the ultrasonic transducer. The machine has to work harder to generate cavitation through all that mass, potentially shortening its lifespan.
Using the Wrong Frequency
Most consumer ultrasonic cleaners operate within a frequency range of 40 kHz to 68 kHz, which is suitable for a wide range of general cleaning applications. Within this range, users can achieve an effective balance between cleaning power and surface safety for everyday items.
Different applications may still benefit from adjusted frequencies. Higher frequencies (typically 80 kHz and above) provide gentler cleaning action, making them suitable for delicate or precision items. Lower frequencies (around 20 kHz to 28 kHz) generate stronger cavitation, which is more effective for removing heavy contaminants in industrial or heavy-duty cleaning scenarios.
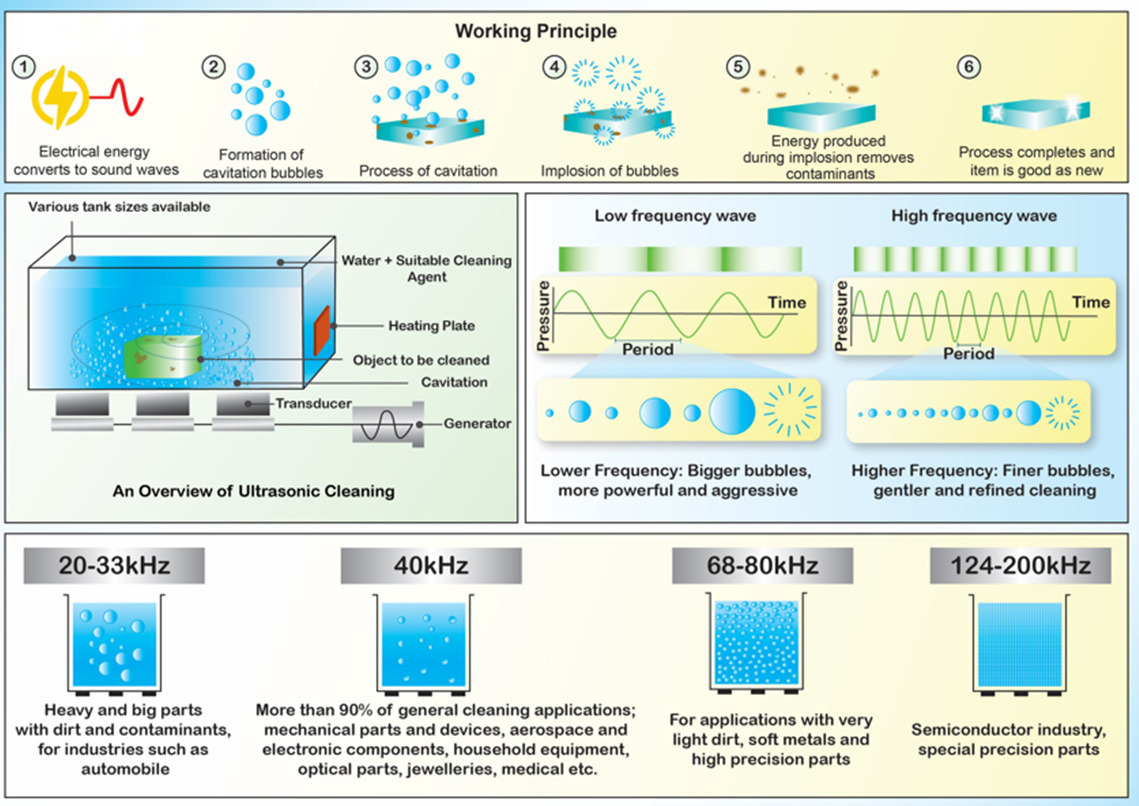
Ultrasonic Frequency Select Guide
Advanced Techniques for Stubborn Contaminants
When standard approaches don’t work, these advanced methods can help.
For items with heavy oxidation or tarnish, a two-step process works wonders. First, soak the item in a chemical tarnish remover for a few minutes. Don’t rinse. Transfer it directly into the ultrasonic cleaner with appropriate solution. The combination of chemical action and mechanical cavitation produces results neither could achieve alone.
For precision mechanical parts with packed-in grease and carbon, heat becomes your ally. I pre-heat both the solution and the items themselves to 70°C to 80°C. The warm metal expands slightly, opening up tight tolerances. The hot solution has dramatically reduced viscosity, allowing better penetration. The intense cavitation at this temperature dislodges even stubborn deposits.
Sweep frequency technology, available on some higher-end cleaners, automatically varies the frequency slightly during operation. This prevents standing waves (dead spots where cavitation doesn’t occur) and ensures more uniform cleaning. If your machine has this feature, definitely use it for challenging items.
For items that can’t be fully submerged, I use the indirect cleaning method. Place the item in a sealed plastic bag with a small amount of solution. Submerge the entire bag in the ultrasonic cleaner. The cavitation transfers through the bag material and cleans the item without direct contact with the tank solution. This works for electronics, items with openings you don’t want solution entering, or materials that might react with your tank solution.
Combining ultrasonic cleaning with other methods produces synergistic results. For example, after ultrasonic cleaning silver, I sometimes follow with a quick tumble in a rock tumbler with polishing media. The ultrasonic removes all contamination, and the tumbling restores shine. The result is better than either method alone.
When dealing with biological contamination (blood, tissue, proteins), enzymatic cleaners specifically formulated for ultrasonic use break down organic matter far better than standard solutions. Medical professionals and taxidermists rely on these specialized solutions for thorough decontamination.
Understanding solution pH matching is crucial for efficiency. Acidic contaminants (rust, mineral deposits) respond best to slightly alkaline solutions. Alkaline contaminants (soaps, certain oils) respond to acidic solutions. Neutral solutions work for general dirt and grease. Using a pH-matched solution can cut cleaning time significantly.
Finally, sequential cleaning with increasingly concentrated solutions works for heavily soiled items. Start with a dilute solution to remove the bulk of contamination. Change to a fresh, more concentrated solution for the second cycle to tackle remaining residues. This prevents overwhelming a single batch of solution with excessive contamination and maintains cleaning effectiveness throughout the process.


