


How to install ultrasonic transducer DIY ultrasonic cleaner?
Browse Volume:1422 Classify:Support
Before we learn the Ultrasonic Transducer installation steps, we need to know how many types of ultrasonic transducers are and the ultrasonic transducer principle.? And you can take a look at our guide for reference about How to choose the frequency of the ultrasonic transducer
The ultrasonic transducer is also called the ultrasonic vibrator or ultrasonic vibration head.
There are two types of ultrasonic transducers, they are installed at the bottom of the ultrasonic bank.
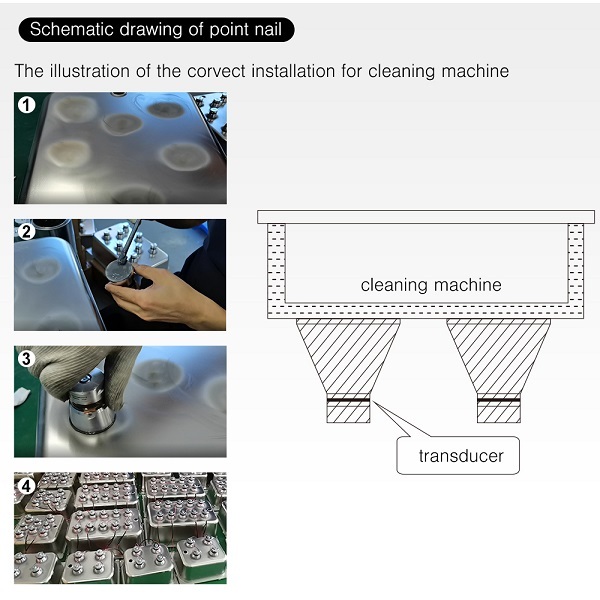
no nail type transducer is flat, adhesion with glue
GB-4540-4SH
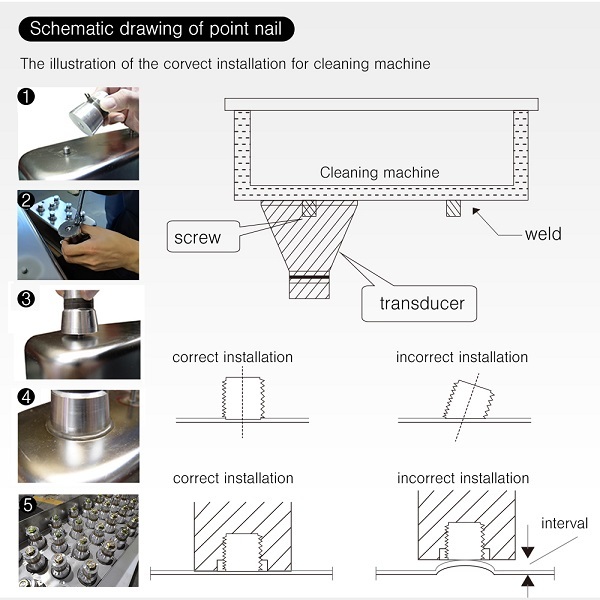
The nail transducer has a screw, installed by welding.
GB-3540-4SHX
1、 Preparation for installation of ultrasonic cleaning equipment:
1. Ultrasonic water tank (shell), ultrasonic transducer, ultrasonic generator, and ultrasonic glue are indispensable.
2. Self-provided tools: argon arc welding or stud welding machine (those with holes at the bottom of the vibrator are for industrial use, and screws should be added at present), soldering iron, tin wire, 2.5 square single core wire, main cable (vibrator to generator bus), 2 * 2.5 national standard cable for less than 30 vibrators, 2 * 4 national standard cable for about 50 vibrators, Allen key 10mm wrench, other sleeves, wire strippers, ties, etc., other heating pipes, temperature control, etc. are prepared as required, I won’t explain them one by one.
2、 Material selection of ultrasonic water tank
1. If the vibrator is directly installed on the sidewall or bottom of the tank body, the material selection of the tank body shall be determined according to the demand. For those with general acidity and alkalinity, 304 material shall be used. For those with high acidity and alkalinity strength, 316 material or titanium material is recommended; For the water tank with shock plate, the best is stainless steel (SUS304) water tank, followed by others. The general requirement is no water leakage and convenient operation.
2. The thickness of ultrasonic stainless steel material is determined according to the power frequency of the vibrator. For the power of about 60W, the thickness is generally 2.0-2.5mm, and the recommended thickness of 100W is 2.5-3.0mm. If it is too thick, the effect is weak, and if it is too thin, the plate is easy to be broken down, affecting its use;
3. Ultrasonic stainless steel welding adopts argon arc welding and internal and external welding. The weld is flat and smooth without false welding, so as to ensure firm waterproof leakage;
3、 Reference principles for selecting frequency and power of ultrasonic vibrator:
1. Determine the frequency of the ultrasonic vibrator according to the cleaning object. For example, 28kHz is mostly selected for hardware degreasing and wax removal, and 40KHz or above is mostly selected for mobile phone lens glass. The vibration intensity from 17k-120k is a weakening trend, but the vibration density is an increasing trend. Choose the low frequency for heavy oil pollution and high frequency for high cleanliness requirements. The specific use should be considered comprehensively and should not be determined based on only one.
2. The vibrator power is determined according to the size of the tank and other actual conditions. The size of the tank is large, and the number of corresponding vibrators needs to be increased. The ultrasonic effective radiation range is generally within 600mm, and the strength will be greatly weakened if it exceeds it. Therefore, the length, width, and height of the tank should also be considered accordingly.
3. According to the difficulty of cleaning, the more difficult the cleaning is, the thicker the oil layer and more pollutants, the higher the corresponding power requirements, that is, the higher the power requirements per unit area.
4. Take 28k60w and 28k100w as examples. For the same number of vibrators, the effect of using 28k100w is good. For the same total power, the effect of using 28k60w is good, that is, the effect of using a large number is relatively good. Don’t ask me why, experience summary.
5. For experiments alone, we are routine applications. For various experiments, we can try our best to put forward some routine suggestions, but we have to experiment by ourselves. No one knows the results without experiments.
4、 The company’s existing glue usage and configuration:
1. Eloda 138m-1 / 998, imported glue, mixed with 5:2, can be tested 8-12 hours after installation, slow drying type, complete set without disassembly.
2. Kmd-398 glue is a 1:1 mixed and quick-drying type. It is recommended to use it according to the instructions on the label. The machine can be tested 4-8 hours after installation and can be divided into small bottles. The test run time shall take into account the external ambient temperature and be considered moderately and comprehensively.
5、 Installation of vibration head:
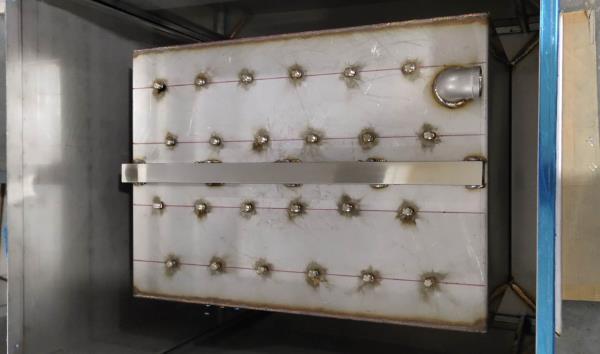
Industrial ultrasonic transducer
1. There are two kinds of welding screws and ultrasonic vibrator screws. One is argon arc welding, and the bottom surface of the screw is flat. The other is welding with a capacitive contact stud welder, and the bottom surface of the screw is provided with convex points. It is often recommended to use a stud welding machine, model Dr-2500, equipped with an M10 chuck, so as to save time and labor. You will know the benefits when you use it. The vibrator screws are welded according to the vibrator installation density. There is no standard requirement for the installation density. Considering the cleaning difficulty and speed, the higher the density, the stronger the power and the better the ultrasonic effect. If the requirements are not high, the vibrator spacing is larger. The general industry standard is that the center distance of two vibrators is 100mm, the spacing is reduced, the power is strengthened, the spacing is increased, and the power is reduced.
2. Apply the glue evenly on the bottom of the ultrasonic vibrator, and gently screw it to squeeze out the air and excess glue between the bottom of the transducer and the contact surface of the cylinder bottom, so that the vibrator can be more closely combined with stainless steel as a whole. Here is a very important problem, which is related to the overall situation, that is, the smaller the gap between the vibrator and the stainless steel after being screwed to the bottom, the better. The final effect will be affected by the failure or unevenness of the screw caused by unevenness.
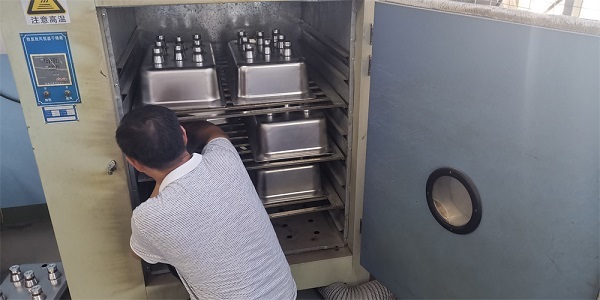
Baking fixed transducer glue connection
3. At the same time, it can be connected. The ultrasonic vibrator is divided into positive and negative electrodes (the positive electrode in the middle of piezoelectric ceramics, and the negative electrode is connected with the upper and lower metals). All the positive electrodes must be connected. Because the negative electrode is connected with the shell, several can be connected to save time. The wiring is in parallel, the positive electrode is connected with the positive electrode, the negative electrode is connected with the negative electrode, and finally connected to the positive and negative electrodes of the ultrasonic generator.


Hello!