


How Effective Is Ultrasonic Cleaning for Gun Parts
Browse Volume:16 Classify:Support
For years, gun owners have relied on brushes, patches, and solvents to clean firearms after a long day at the range or in the field. These tools get the job done, but not always efficiently. Carbon fouling, lead residue, and stubborn lubricant build-up can cling to parts like bolts, firing pins, and trigger assemblies. And with precision weapons, even the smallest debris can affect function.
Enter ultrasonic cleaners—once reserved for industrial and laboratory use, now rapidly gaining popularity in the firearms world. These machines offer a faster, more thorough way to clean gun parts by using microscopic bubbles and sound waves instead of elbow grease. What was once a time-consuming chore is now something you can accomplish in under an hour, hands-off.
The appeal is obvious. Ultrasonic cleaning doesn’t just remove visible grime—it reaches into tight spaces, gas rings, extractor grooves, and inside bolt carrier channels. For competitive shooters, law enforcement, and gun hobbyists who demand peak performance, ultrasonic technology promises to clean deeper than any brush can reach.
But can you really drop your gun parts into one of these machines without doing damage? And if it’s safe, which parts are ideal candidates—and which aren’t?

Machine Gun
What Does an Ultrasonic Cleaner Actually Do?
To understand the pros and limitations of ultrasonic cleaning for firearms, it’s important to grasp the science behind the process.
An ultrasonic cleaner works by transmitting high-frequency sound waves—typically between 25 kHz and 40 kHz—through a tank filled with cleaning solution. These waves create a phenomenon called cavitation, where thousands of microscopic bubbles rapidly form and collapse in the liquid. This implosion produces localized bursts of pressure and heat, scrubbing away contamination from every surface the liquid can touch.
What makes ultrasonic cleaning uniquely effective is its ability to:
- Reach into narrow channels, firing pin holes, and slide rails
- Remove carbon fouling, burnt powder, lubricant buildup, and even copper or lead deposits
- Avoid mechanical abrasion that can wear down gun finishes over time
Ultrasonic cleaners vary by size and power. Consumer-grade models often hold 1–3 liters and run at fixed frequencies. Higher-end units used by gunsmiths and police departments typically offer adjustable frequency, built-in heating, and timed degassing, which helps optimize bubble formation before the cleaning cycle begins.
Temperature plays a big role. Warm solution (around 50–60°C / 122–140°F) increases cleaning efficiency, especially when targeting oils or hardened residues. But too much heat can damage polymer components or compromise coatings if you’re not careful.
The cleaning solution itself also matters. A proper ultrasonic gun cleaner isn’t just filled with water. Instead, it’s loaded with a firearm-safe detergent, specially formulated to break down carbon and oil without corroding metals.
Granbo Ultrasonic Cleaner For Guns
Overall, ultrasonic cleaning offers a unique combination of depth, speed, and precision, making it particularly attractive for cleaning hard-to-reach or heavily fouled gun parts. But not every part is a candidate for this method.
What Gun Parts Can Be Safely Cleaned in an Ultrasonic Cleaner?
When used correctly, ultrasonic cleaners can clean many metal firearm components with impressive results. The most common and safe candidates include:
- Bolt carrier groups (BCGs) from AR-style rifles
- Slides, barrels, and firing pins from pistols
- Gas blocks, bolts, and extractors from rifles and shotguns
- Trigger components and springs, provided they’re disassembled
These parts are typically made of hardened steel, stainless steel, or coated aluminum, which can withstand cavitation and heated solution cycles without issue—especially when properly rinsed and lubricated afterward.
Stripped-down parts—those free of O-rings, plastic, or adhesives—are best suited for ultrasonic cleaning. That means removing any polymer buffers, optics, electronics, or rubberized seals before placing items in the tank. As a rule of thumb, if the part is made of solid metal with no fragile coatings or inserts, it’s likely a good candidate.
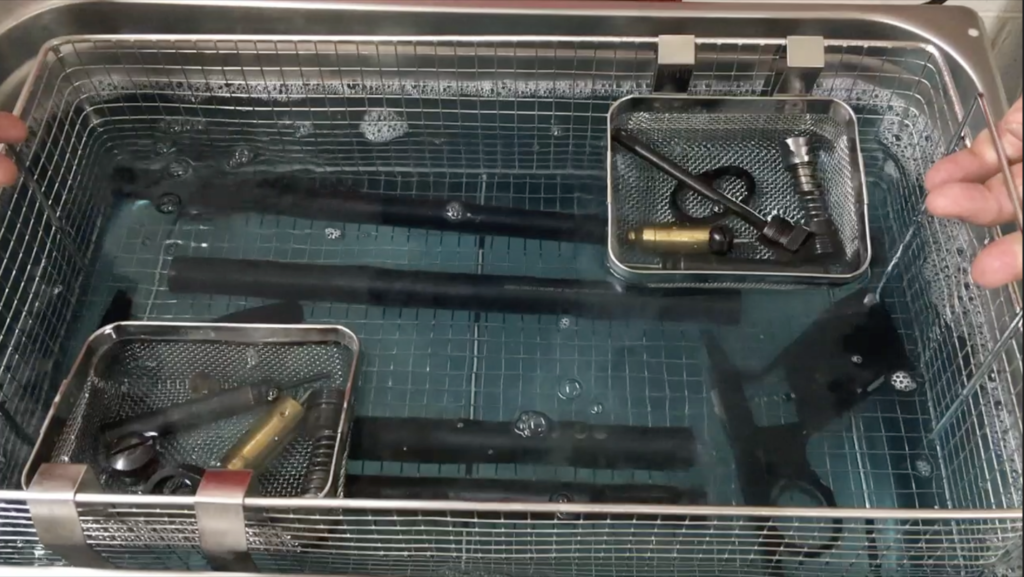
It’s also important to note that parts should be suspended in a basket or tray, not placed directly on the bottom of the tank. This reduces vibration damage and ensures uniform exposure to cavitation.
This method is commonly used for cleaning heavily fouled metal parts and is trusted by law enforcement agencies for routine firearm maintenance.
Of course, lubrication is key after cleaning. Ultrasonic processes strip all oils and protectants from the surface. After rinsing and drying, every metal surface must be properly oiled or greased—especially if the firearm will be stored long term.
Gun Parts That May Be at Risk in Ultrasonic Cleaners
Ultrasonic cleaning might seem like a universal solution, but it’s not safe for every firearm component. Certain materials and assemblies can be damaged by heat, vibration, or chemical interaction if precautions aren’t taken.
Polymer frames, common in many modern handguns, can warp or degrade under prolonged ultrasonic exposure—especially if the solution is too hot. While short, controlled cycles at low temperatures might be safe for some polymers, the risk generally outweighs the reward. Manufacturers like Glock and Smith & Wesson do not recommend ultrasonic cleaning for their polymer frames.
Wooden grips and stocks are also a no-go. Cavitation causes moisture to seep into grain and glue seams, potentially leading to swelling, cracking, or delamination. Even sealed wood can be compromised over repeated exposure.
Then there are electronic components—like red dot sights, laser modules, and smart trigger sensors. These should never go into an ultrasonic cleaner. Even if they’re waterproof or shock-resistant, ultrasonic energy can vibrate internal circuitry in unpredictable ways, degrading performance or rendering devices unusable.
Painted, cerakoted, or anodized finishes may also be affected. Some finishes are durable enough to withstand ultrasonic vibration, but others may peel, dull, or become cloudy over time—especially if the cleaning solution is too strong or too hot.
Finally, avoid ultrasonic cleaning of assembled parts. Ultrasonic waves penetrate wherever liquid flows, meaning they can drive moisture and debris into seams, threads, or internal cavities that are hard to dry or inspect. Always disassemble parts fully to avoid hidden damage or corrosion points.
When in doubt, consult your firearm manufacturer’s maintenance guide or speak with a qualified gunsmith before submerging sensitive components in an ultrasonic bath.
What Cleaning Solution Should You Use for Firearm Parts?
The choice of cleaning solution is just as important as the machine itself. Using the wrong fluid can damage gun components, while the right one can enhance performance and protect finishes.
For firearms, the solution must be:
- Non-corrosive to metal
- Non-reactive with coatings or treatments
- Capable of breaking down carbon, lead, and grease
Most ultrasonic cleaners work best with a mild alkaline solution, which lifts carbon fouling without attacking steel or aluminum. Reputable brands like Lyman, Hornady, and Slip2000 offer gun-specific ultrasonic cleaning concentrates that are safe for hardened metals and common finishes.
Solutions that contain surfactants and emulsifiers help break down thick carbon deposits and suspend particles in the bath. These solutions also prevent redeposition during cleaning.
On the other hand, avoid:
- Ammonia-based cleaners, which may damage aluminum or remove protective oxide layers
- Acidic solutions, which can corrode parts rapidly if left unattended
- Household soaps or degreasers, which are often too aggressive or leave residues behind
You should also consider solution life span. After multiple uses, ultrasonic solutions become saturated with fouling, which reduces their effectiveness. Replace or filter the solution regularly to avoid cycling grit and debris back onto clean parts.
When preparing the tank:
- Always follow the dilution instructions
- Degas the solution (run a brief cycle without parts) before the first cleaning
- Maintain a consistent temperature—50–60°C (122–140°F) is ideal for most gun-safe solutions
Some users prefer a two-stage process: one bath for cleaning, and another with clean water or water-soluble rust inhibitor for rinsing. This ensures complete chemical removal before drying and lubricating.
Step-by-Step: How to Ultrasonically Clean Gun Parts Safely
Using an ultrasonic cleaner for firearms can be fast and effective—if done properly. Here’s a field-tested procedure to clean gun parts without risking damage:
1. Disassemble the firearm completely.
Strip down all parts, removing springs, pins, optics, and any non-metal elements. Only metal parts should go in the cleaner unless otherwise specified by the manufacturer.
2. Pre-rinse if needed.
Wipe off heavy grime or grease with a cloth or brush. This reduces contamination of your cleaning solution and improves results.
3. Prepare the solution.
Mix your firearm-specific cleaning concentrate with water according to label directions. Make sure the solution is at the recommended temperature before starting the cycle.
4. Load parts into the basket.
Do not allow parts to rest on the tank bottom. Use a mesh basket or tray to suspend them in the liquid. Avoid overlapping or stacking parts.
5. Run the cleaning cycle.
Most parts require 5–10 minutes depending on the level of fouling. Check your unit’s frequency—lower frequencies (around 25–28 kHz) are more aggressive and best for heavily fouled parts, while higher frequencies (40 kHz+) are gentler.
6. Rinse thoroughly.
After the cycle, rinse parts with clean water to remove any residual detergent or loosened debris. A second ultrasonic rinse bath is optional but helpful for detailed cleaning.
7. Dry completely.
Use compressed air or a lint-free cloth to dry every surface, crevice, and cavity. Moisture left in threads or springs can cause rust within hours.
8. Lubricate and protect.
Ultrasonic cleaning strips away all lubricants and protective coatings. Apply gun oil, grease, or CLP to all relevant surfaces before reassembly or storage.
9. Clean your cleaner.
After each use, drain and clean the tank to prevent contamination or corrosion. Dirty solution reduces effectiveness and may damage parts in future sessions.
How Ultrasonic Cleaning Compares to Traditional Gun Maintenance
Ask any seasoned gun owner, and they’ll likely have a favorite method for cleaning firearms. Whether it’s a well-worn bore snake, brass brushes dipped in CLP, or cotton patches soaked in solvent, traditional cleaning techniques are tried and trusted. But that doesn’t mean they’re the most efficient or thorough—especially when dealing with precision firearms or deep-set carbon fouling.
Ultrasonic cleaning doesn’t replace all manual maintenance, but it significantly enhances it. Instead of brushing each component individually and guessing whether you’ve reached every recess, ultrasonic technology bathes all parts evenly in cavitation bubbles. This allows cleaning action to reach into tight clearances, gas ports, extractor cuts, and firing pin channels without disassembly beyond the major field strip.
Time savings is a major advantage. Once the parts are in the basket and the solution is warmed, the machine does the work. There’s no laborious brushing or scrubbing required—just a rinse and lube after the cycle finishes. For those cleaning multiple firearms at once or running a gunsmithing operation, this can save hours.
However, traditional cleaning still has its place:
- It’s more portable and better suited for field use
- It allows close inspection of parts during cleaning
- It avoids risks associated with improper ultrasonic use (like overheating or wrong solution)
Ultrasonic cleaning also requires machine maintenance. The tank must be cleaned regularly, the solution replaced, and the equipment properly stored. And while it excels at carbon removal, it doesn’t polish bores, remove rust pitting, or scrape away baked-on lacquer unless paired with other methods.
For the average gun owner, the most effective routine might be a hybrid approach—manual cleaning for regular maintenance and ultrasonic cleaning for periodic deep cleans or post-heavy-use sessions, such as after range days or tactical drills.
Insights from Gunsmiths and Firearms Professionals
Professionals in the firearms industry have long used ultrasonic cleaners—not just for convenience, but for the consistency and quality they deliver.
Military armorers, law enforcement armories, and defense contractors routinely rely on ultrasonic technology to clean entire fleets of weapons. For instance, the U.S. Army has used ultrasonic cleaners for weapons like the M16 and M4, especially in desert or urban environments where sand and grime become embedded in fine mechanical tolerances. These systems are often custom-built to military spec and can clean dozens of components at once.
Gunsmiths and competitive shooters also turn to ultrasonic cleaners for their ability to remove carbon from tight areas without manual abrasion. Some smiths even use ultrasonic baths to clean small tools, dies, and suppressor baffles.
According to a report by the National Shooting Sports Foundation (NSSF), over 60% of surveyed full-time gunsmiths use ultrasonic cleaners weekly in their workshops. The main benefits cited include:
- Time efficiency when cleaning multiple customer firearms
- Reliable cleaning of hard-to-reach internals
- Safe removal of carbon without wire brushes or scrapers
In a 2021 interview with Guns & Ammo, master gunsmith Larry Weeks emphasized that ultrasonic cleaning “has become an essential part of modern bench work,” but warned that “understanding metallurgy, finishes, and chemistry is essential before dropping parts into a tank.”
Many professionals follow strict procedures:
- Inspecting parts before and after every ultrasonic cycle
- Avoiding ultrasonic use on historical or unknown-finish firearms
- Always lubricating and rust-proofing immediately post-cleaning
The consensus is clear: ultrasonic cleaning is highly effective when done correctly. But like any tool in a pro’s kit, it must be used with knowledge, not just convenience in mind.
Can Ultrasonic Cleaning Affect Metal Fatigue or Gun Tolerances?
A persistent concern among gun owners is whether ultrasonic cavitation—despite being non-contact—could somehow degrade firearm tolerances or cause metal fatigue in precision-machined parts. These fears, while understandable, are often based more in myth than science.
Let’s unpack this.
Cavitation forces are microscopic. The imploding bubbles in an ultrasonic bath release localized energy, but not nearly enough to deform hardened steel. The pressure is sufficient to lift carbon fouling, but not to bend or warp a milled bolt or forged slide. Reputable studies from materials science labs confirm that ultrasonic cavitation does not cause structural changes to metals under typical cleaning conditions.
In fact, ultrasonic cleaning is widely used in industries where precision tolerances are even tighter than firearms. Aerospace components, surgical instruments, and microelectronic parts are cleaned ultrasonically every day—with no compromise to dimensional accuracy or integrity.
That said, ultrasonic cleaning can indirectly contribute to damage under specific circumstances:
- If small parts are vibrated against each other, chipping or scratching may occur
- If parts are placed directly on the tank floor, they can resonate and degrade
- If poor-quality solutions corrode the metal, long-term exposure could reduce surface hardness or finish
Some owners of custom or match-grade firearms worry about removing coatings or breaking in tolerances. In truth, unless the solution is overly alkaline or the parts are left in too long, the tolerances of properly hardened components remain unaffected.
Firearms are designed to handle combustion pressures, rapid cycling, and environmental abuse. Compared to that, a five-minute ultrasonic bath is mild. What matters is that the user follows best practices: proper solution choice, controlled temperature, and post-cleaning lubrication.
For peace of mind, owners of high-end competition pistols or precision rifles may choose to clean only selected parts ultrasonically—such as bolts and firing pins—while cleaning the rest manually. This balance provides deep cleaning where it matters without touching sensitive finishes or fittings.
Common Mistakes That Could Damage Your Gun
While ultrasonic cleaning is effective, using it improperly can lead to problems that range from minor cosmetic wear to serious mechanical failures. These mistakes are common, especially for new users who assume that “set it and forget it” applies to firearms.
One of the most damaging errors is overheating the solution. Too much heat can distort polymer components, degrade seals, or even cause bluing or anodized finishes to fade. Most ultrasonic cleaners allow temperature control—keep it between 50–60°C (122–140°F) and monitor it periodically.
Another issue is using the wrong cleaning solution. Harsh chemicals, like ammonia or bleach, can etch finishes, corrode internal parts, or strip protective coatings. Using gun-specific ultrasonic detergents avoids this risk.
Placing parts directly on the bottom of the tank is a subtle but serious mistake. This can damage both the parts and the machine’s transducers. Always suspend items in a basket or on a non-metallic rack.
Cleaning the wrong materials, like wood, electronics, or assembled parts, can cause warping, delamination, or water retention inside sealed areas. Always disassemble your firearm completely, and double-check that all parts are compatible with ultrasonic cleaning.
Finally, skipping the post-clean lubrication step leaves your parts vulnerable. Ultrasonic cleaning strips away every trace of oil—beneficial during cleaning, but disastrous if left unprotected. A light coat of quality gun oil after drying is essential to prevent rust and maintain function.
Best Ultrasonic Cleaners for Gun Enthusiasts
Not all ultrasonic cleaners are created equal. If you’re buying one specifically for gun parts, you’ll want features that meet the demands of firearm cleaning—both in terms of power and safety.
Look for a machine with:
- Adjustable temperature control
- Tank capacity of at least 2.5 to 6 liters for handgun parts or full slides
- Frequency between 28–40 kHz, with lower frequencies for carbon-heavy parts and higher frequencies for delicate surfaces
- A timer, ideally with cycles up to 30 minutes
- Degassing function, which improves bubble consistency in fresh solution
- Stainless steel basket to keep parts elevated and protected
Some advanced models offer dual-frequency or pulse cleaning modes, ideal for removing caked-on fouling from suppressor baffles or rifle bolts. These professional-grade units are commonly used by both gunsmiths and firearm enthusiasts.
Before purchasing, consider what you’ll be cleaning most often. If it’s handgun slides and small parts, a benchtop unit will suffice. But if you plan to clean rifle barrels or multiple firearms in one session, look for larger industrial-style tanks—preferably with a lid and drain valve for easy maintenance.
When Should You Avoid Ultrasonic Cleaning Altogether?
Ultrasonic cleaning is powerful, but it’s not the answer for every situation. Certain circumstances make manual or professional cleaning a better choice.
If you’re in the field, at the range, or in a situation where drying and lubricating thoroughly is not possible, skip the ultrasonic cleaner. The process requires controlled conditions to avoid introducing moisture into sensitive areas.
For budget firearms or older guns with unknown coatings or materials, ultrasonic cleaning may do more harm than good. Painted finishes, older adhesives, or low-cost manufacturing methods may not tolerate heat or vibration well.
If your firearm’s manufacturer or warranty documentation explicitly warns against ultrasonic cleaning, follow that guidance. Some companies void warranties if damage occurs from non-recommended cleaning techniques.
Lastly, if your gun includes electronics, optics, lasers, or smart systems, avoid ultrasonic cleaning on those parts altogether. Not even waterproofing guarantees internal circuit safety under ultrasonic conditions.
In any of these cases, manual cleaning with approved solvents and tools is safer and more controllable. When in doubt, ask your gunsmith or contact the manufacturer.
Myths and Misunderstandings About Ultrasonic Gun Cleaning
As ultrasonic cleaning becomes more popular, myths have taken root—especially online. Let’s clear up some of the most persistent.
“Ultrasonic cleaners damage guns.”
Not inherently. Damage occurs when users apply the wrong solution, wrong temperature, or clean incompatible parts. Used correctly, ultrasonic cleaners are used daily by gunsmiths, law enforcement, and the military.
“You can toss in a whole gun without disassembly.”
Absolutely false. Assembled guns trap fluid, hide fouling, and create blind spots for cavitation. Always disassemble completely and clean only the compatible components.
“Ultrasonic cleaning removes metal or loosens tolerances.”
This is untrue for properly hardened and treated metals. There’s no scientific evidence that ultrasonic cavitation alters firearm tolerances unless corrosion or pitting occurs due to misuse.
“It replaces all other forms of maintenance.”
Ultrasonic cleaning is a supplement, not a full substitute. It excels at deep cleaning but does not polish bores, remove burrs, or replace critical inspection and lubrication steps.
Knowing the facts helps gun owners make better decisions—and avoid the mistakes that fuel myths in the first place.
Final Thoughts: Should You Use Ultrasonic Cleaning for Firearms?
Ultrasonic cleaning is one of the most effective ways to deep clean firearm components—particularly when you’re dealing with fouled bolts, carbon-encrusted slides, or grimy small parts. It offers unmatched access to internal cavities and removes debris far beyond what manual brushing can reach.
That said, it’s not a magic solution. It requires understanding, proper technique, and attention to detail. Not all gun parts are compatible, and not every cleaner is built for the demands of firearm maintenance.
If you use the right machine, the right solution, and clean only appropriate materials, ultrasonic cleaning can dramatically simplify and improve your gun care routine. But as with anything involving firearms, knowledge is power.
Know your gear, respect the process, and always follow up with inspection, lubrication, and proper storage. Your firearm will thank you with better performance, smoother operation, and longer service life.


