


Ultrasonic Cleaner Power and Frequency: A Practical Selection Guide
Browse Volume:53 Classify:Support
Picking the wrong ultrasonic cleaner is easier than most people expect. A lot of buyers focus on tank size or price, and end up with a unit that either damages their parts or leaves them half-clean. The two settings that matter most are cleaning frequency and cleaning power, and understanding how they work together will save you time, money, and a great deal of frustration.
Why These Two Settings Define Your Cleaning Performance
Ultrasonic cleaners work by sending high-frequency sound waves through a liquid, creating millions of microscopic bubbles that collapse against surfaces. This process, known as cavitation, is what actually does the cleaning. The frequency controls the size and intensity of those bubbles. The power controls how aggressively they form and how forcefully they act on contaminated surfaces.
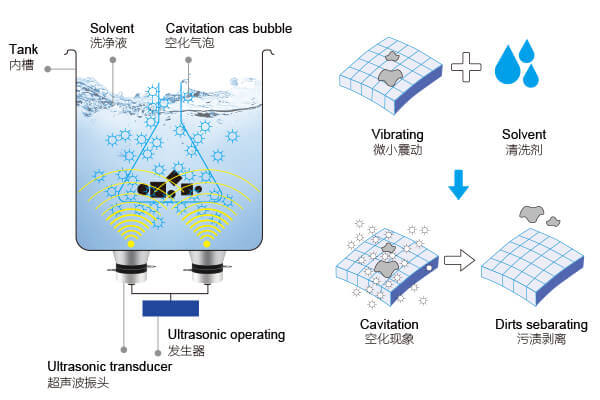
The Principle Behind Ultrasonic Cleaning
If the frequency is too high for your application, the bubbles will be too small to dislodge heavy contaminants. If it is too low, it can damage soft or delicate surfaces. Similarly, too little power means weak cavitation and poor results. Too much power can erode or pit surfaces over time.
Getting these two settings right is not just a technical detail. It is the foundation of the entire cleaning process.
A Closer Look at Ultrasonic Frequency
Ultrasonic Frequency Select Guide
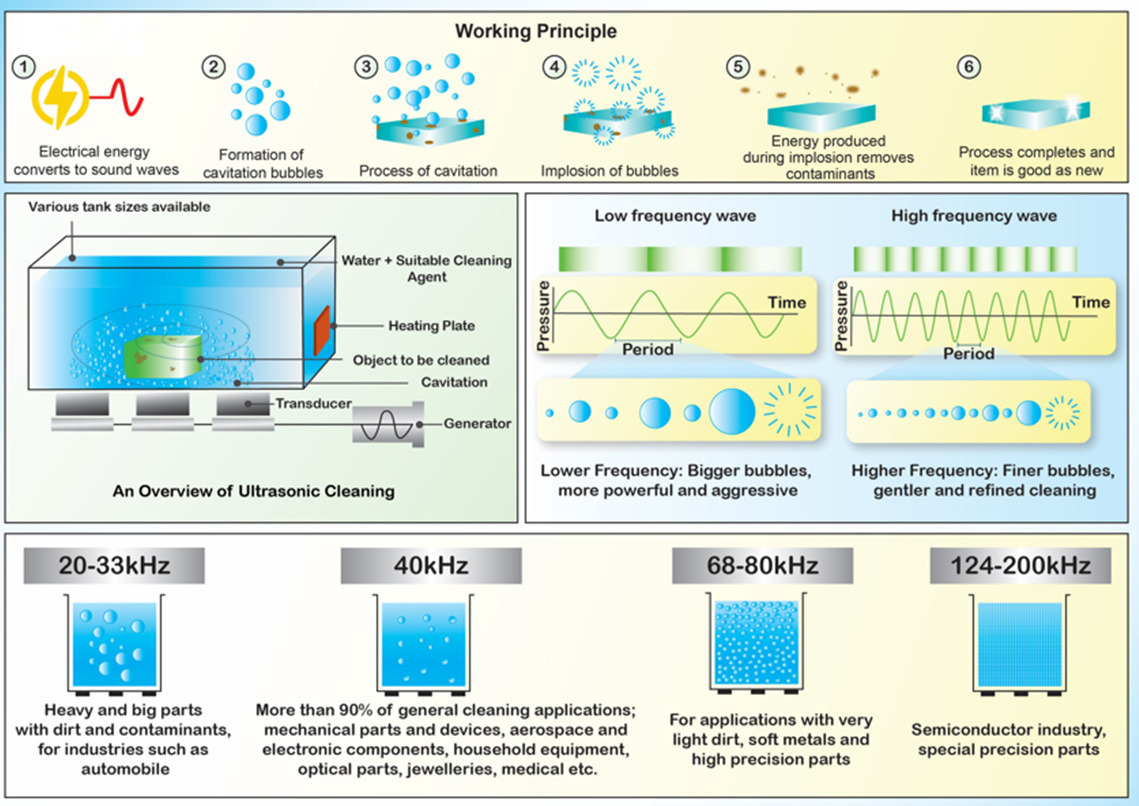
Frequency is measured in kilohertz (kHz), and most commercial ultrasonic cleaners operate somewhere between 20 kHz and 200 kHz. The core principle is straightforward: lower frequencies produce larger, more aggressive cavitation bubbles, while higher frequencies produce finer, gentler ones. Each range has its own strengths and clear limits depending on what you are cleaning.
Low Frequency (20–33 kHz): Heavy-Duty Industrial Cleaning
At 20–33 kHz, the sound waves have a long pressure cycle, which allows large cavitation bubbles to form and collapse with significant force. That energy release is what makes this range effective against heavy contamination, thick grease, rust, scale, and deeply embedded debris on large or irregularly shaped parts.
This range is primarily used in industries where parts are both big and heavily soiled:
- Automotive components, including engine blocks, carburetors, and brake assemblies
- Large metal castings coated with machining oils or industrial residue
- Heavy tooling used in manufacturing environments with serious surface buildup
The tradeoff is real. That same aggressive force can damage softer materials. Rubber seals, plastic components, and coated surfaces are at risk when exposed to 20–33 kHz for extended cycle times. Always confirm your material can handle this intensity before running a full batch.
Standard Frequency (40 kHz): The Universal Workhorse
The 40 kHz range deserves its own category because of how dominant it is in the market. According to the frequency use data shown in the image, more than 90% of general cleaning applications are handled at 40 kHz. That figure speaks for itself.
At this frequency, cavitation bubbles are smaller and more evenly distributed compared to low-frequency operation. The cleaning action reaches complex geometries, threaded recesses, and tight gaps more consistently, without the surface aggression that comes with lower frequencies.
The application range at 40 kHz is genuinely broad:
- Mechanical parts and devices across general manufacturing
- Aerospace and electronic components that require thorough but controlled cleaning
- Household equipment and consumer products
- Optical parts and jewelry where surface finish needs to be preserved
- Medical instruments where cleanliness standards are high and surface integrity matters
For most buyers choosing their first ultrasonic cleaner, a 40 kHz unit covers the overwhelming majority of what they will ever need to clean.
High Frequency (68–80 kHz): Precision Cleaning for Sensitive Parts
As frequency rises into the 68–80 kHz range, the pressure cycles become shorter and the cavitation bubbles become significantly finer. The cleaning action shifts from forceful scrubbing to thorough, gentle surface contact. This makes the range well-suited to applications where the contamination is light but the surface demands care.
Typical use cases at this frequency include:
- Very light dirt and film residues that do not require aggressive removal
- Soft metals that could be pitted or eroded by lower frequency energy
- High precision parts where dimensional accuracy and surface condition must be maintained after cleaning
If your parts fall into any of these categories, running them at 40 kHz or lower is likely to cause more harm than the cleaning itself solves. Moving up to this range is not about being cautious for the sake of it. It is about matching the cleaning energy to what the material can actually tolerate.
Ultra-High Frequency (124–200 kHz): Semiconductor and Special Precision Applications
At 124–200 kHz, the bubbles are extremely fine and the cleaning energy is highly controlled. This is the territory of the semiconductor industry and specialized precision manufacturing, where surface cleanliness requirements operate at the microscopic level and even minor physical stress on the part is unacceptable.
Equipment operating in this range is typically found in cleanroom environments, semiconductor fabrication facilities, and advanced research labs. The cleaning targets are often nano-scale contaminants that standard frequencies cannot address without risking surface damage.
This frequency range is not a general-purpose solution. If your application does not specifically fall within semiconductor or specialty precision manufacturing, it is unlikely you will need to operate here. For everyone else, the 40 kHz and 68–80 kHz ranges provide all the precision needed for professional-grade results.
How to Choose the Right Frequency for Your Application
Start with the material you are cleaning, not the type of dirt. The material sets the upper and lower frequency boundaries you can safely work within. Once you know what the surface can handle, match the frequency to the contamination type.
As a practical guideline:
- Use 20–40 kHz for hard metals with heavy contamination
- Use 40–60 kHz for general industrial or lab use involving mixed materials
- Use 60–80 kHz for electronics, medical tools, and moderate contamination on sensitive surfaces
- Use 80 kHz and above for precision optics, jewelry, and semiconductor components
When working with multi-material assemblies, always base your frequency selection on the most sensitive component in the batch. You can always do a second pass at a different frequency for tougher spots, but surface damage cannot be undone.

Understanding Cleaning Power and Wattage
Frequency tells you how the cleaning energy behaves. Power tells you how much of it you have.
What Wattage Tells You
The wattage of an ultrasonic cleaner refers to the electrical power consumed by the transducers that generate the sound waves. Higher wattage generally means more intense cavitation activity, which translates to faster and more thorough cleaning.
However, wattage alone is not a reliable indicator of cleaning performance. A 300W unit with a large tank may actually underperform a 150W unit with a smaller tank, simply because the energy is spread too thin. This is where power density becomes the more useful metric.
Power Density: The Better Benchmark
Power density is calculated by dividing the total wattage by the tank volume in liters. Most professional cleaning applications call for a power density of 10–30 watts per liter, depending on the difficulty of the task.
For light cleaning tasks, such as removing dust or light oils from electronics, 10–15 W/L is usually enough. For medium-duty work like laboratory glassware or dental instruments, 15–20 W/L is appropriate. For heavy industrial cleaning, you may need 25–30 W/L or more.
Here is a simple way to apply this in practice:
- If you have a 3-liter tank, aim for a cleaner rated between 30W and 90W depending on your needs
- If you have a 10-liter tank, look for a unit rated between 100W and 300W
- For a 30-liter industrial tank, you should be working with 300–900W of transducer power
Always verify whether the manufacturer’s listed wattage refers to input power or actual transducer output power. Some budget units list peak wattage, which overstates real-world performance by 50% or more.
How to Match Power Level to Your Cleaning Job
Think about the combination of surface hardness, contamination type, and part geometry when choosing your power level. Hard parts with heavy contamination and deep recesses need higher power density to ensure the cavitation reaches all surfaces. Thin, delicate parts with light contamination need lower power density to avoid fatigue damage or surface erosion.
Cycle time also plays a role. If you are running a production line and need parts cleaned in under five minutes, you will need higher power density than someone who can leave parts soaking for 15–20 minutes.
Temperature matters too. Cavitation efficiency increases as the cleaning solution warms up. Most ultrasonic cleaners perform best when the solution temperature is between 50°C and 65°C. If your unit has a built-in heater, use it. This allows you to achieve strong cleaning results without running the power all the way up.
When Frequency and Power Work Together
The real art of ultrasonic cleaning comes from pairing the right frequency with the right power level. They are not independent variables. A change in one affects how the other performs.
For example, a 40 kHz cleaner at 20 W/L will outperform a 28 kHz cleaner at 10 W/L for general-purpose cleaning, even though the lower frequency seems more aggressive. The higher power density compensates and provides more consistent cavitation at a frequency that is safer for a wider range of materials.
Conversely, using very high power at a low frequency for extended periods can lead to transducer erosion, tank pitting, and even physical damage to parts. Even in industrial settings, experienced operators actively monitor for this and adjust cycle times accordingly.
Common Mistakes When Selecting an Ultrasonic Cleaner
Many buyers make the same avoidable errors. Being aware of them upfront helps you make a smarter purchase decision.
- Choosing frequency based on price rather than application. Lower-frequency units are often cheaper, but that does not make them the right choice for your parts.
- Ignoring power density and focusing only on total wattage, which leads to poor performance in larger tanks.
- Assuming one unit fits all needs. If you clean both heavy engine parts and sensitive electronics, you may genuinely need two different cleaners or a multi-frequency unit with adjustable settings.
- Overlooking the role of cleaning chemistry. Even the perfect frequency and power combination will underperform if the cleaning solution is not matched to the contaminant type.
Practical Tips from Real-World Experience
People who work with ultrasonic cleaners daily develop habits that make a noticeable difference in results:
- Always degas the solution before the first cleaning cycle. New solution holds dissolved gases that suppress cavitation. Running the cleaner for 5–10 minutes without parts removes those gases and significantly improves performance.
- Do not overload the tank. Parts stacked on top of each other block cavitation from reaching all surfaces. Use baskets that allow full solution circulation around every component.
- Match the cleaning agent to the contaminant. Water alone works for some jobs, but adding a compatible ultrasonic cleaning detergent can dramatically improve results on oils, oxides, and biological residues.
- Test on a sample part first whenever you are working with a new material or a new cleaner. This is especially important when operating near the limits of a given frequency range.
Making the Right Choice the First Time
Selecting the right frequency and power for your ultrasonic cleaner comes down to knowing your parts and your process well. Start by identifying the most sensitive material you will be cleaning, then match the frequency to that material. From there, calculate the power density you need based on contamination severity and how much time each cycle can take.
A 40 kHz cleaner with a power density of 15–20 W/L covers the majority of everyday cleaning needs across labs, workshops, and light industrial environments. If your work involves anything more specialized, on either end of the frequency spectrum, it is worth investing in a unit purpose-built for that application rather than trying to stretch a general-purpose cleaner beyond what it was designed to do.
Getting this right from the start means cleaner parts, longer equipment life, and far fewer headaches down the road.
Granbo Ultrasonic Cleaner Manufacturer


